Showing posts with label EverNote. Show all posts

Evernote: Z is for Zoom

Zoom allows you to increase and decrease the size of the text or graphics in the note.
Holding down the CTRL key and using the mouse ball does not work.


Shortcut keys
As illustrated on the menu above.

Evernote: Y is for sYnc

Evernote syncs your notes between your different platforms on your same account. If you have two accounts the syncing is only within one account.

Evernote syncs all notes in all your platforms every 2 minutes.
If you need the syncing done sooner, you can click on Sync icon in the top left corner of the screen or the shortcut key.

Shortcut Key:  F9

Evernote: X is for X (Delete)

X in the computer world means delete. The following lists how to delete a note, delete text or items from a note and delete a tag.

Delete a note
1. Select the note you want to delete.

2. Click Edit from the top menu, select Delete 

or just click on the Delete key.

The note is moved to Trash immediately.

Delete text from a note
Select text you want to delete.
Click Edit from the main menu
Click on Delete

Or just click the Delete key. Shortcut key is the Delete key as illustrated on the right.


Delete from Trash
1. Click on the Delete key (on your keyboard).
    The following message appears.

2. Click on Delete.

Or

1. Right Click on a note in Trash.
    The following menu appears


Select Restore Note if you can return the note to the original location.

Select Expunge Note to delete it permanently.
The following message appears,.


3. Click Delete Note


Delete a tag
1. Click on Tags on the left menu

2. Right Click on the tag you want to delete.

3. Select Delete.
The following screen appears.

If you want to delete the tag select Delete Tag.

Evernote: W is for Web Clipper

Web Clipper is a free app that you can download to add to your web browser.
Once installed it will allow you to "clip" all or part of a website into a picture.

Download and add app to your web browser
1. Go to https://evernote.com/products/webclipper
2. Download the app. Icon now appears in top right hand corner of your web browser beside the address bar.
This only adds the app to the web browser you are in. If you want it in another browser do the above steps in that web browser as well. 

To select part or all of a website
There are two ways to clip. The icon app on the address bar and right click.

Use the app icon on address bar.
1. Go to a website you want to "clip".

2. Click on the Clipper icon in the top right of the web browser. (Shown top right of the post)

3. The web page is outlined in thick green border.

4. Evernote appears in a panel on the right side of your screen.

5. You can expand or shrink the amount that will be captured by clicking on the + or – signs.
The green line will jump from section to section.


6. Click on Save.
The part of the website you highlighted is now in Evernote as a new note in the Notebook selected on the panel.

Use the Right Click 
1. Go to a web page that has great information.

2. Right click on the page.
The following menu appears.
(Evernote Web Clipper has been added to the regular menu when you added the app)


3. Click on Evernote Web Clipper.

4. Select one of the three choices that appear in the menu on the right.
    Clip full page to Evernote
    Clip bookmark to Evernote
    Clip screenshot to Evernote
5. That item is now in a new note.
Once you have selected part or all of the website, the following window appears on the right. 


6. Review this black window. Click on the Notebook you would like to save the clip into, if any.

7. Click Save clip.
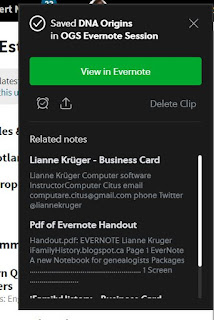
The black window changes to something similar as shown below. It shows notes that are related to the note you just created. Your related notes will be different than mine related notes.


Evernote: V is for Version and Paste Destination Formatting

Evernote keeps track of when a note was created and the versions of the note.

To find out the note's version

1. Click on the i (with a circle around it)  in the top right hand corner.

The following appears


V is also for CTRL / Shift / V
This shortcut will paste text that you have copied into the blackboard

1. Select the text you want to Copy or Cut.

2. Copy or Cut the item.

3. Click in the location you want to paste the text into.

4. Press CTRL / Shift / V

The text is pasted at the cursor point with the formatting of the new location.
If the text was formatted such as a different color, bold, italic or any other kind of formatting, using these keys will paste it with the formatting of the new location instead.


Evernote: T is for Table of Contents

There are a couple of reasons for creating a Table of Contents
  • If you are writing a story or a book it is good to have a Table of Contents 
  • If you want to have a list of all related notes for a surname, location or subject 
  • To create a list of all certificates or census records or related items in one note. 
A. Select all the notes that you want in the table of contents. 

To select adjacent notes (notes beside each other)
1. Click on the first note.
2. Hold down the Shift key
3. Click on the last note.
4. Let go of the Shift key. 
    All notes are now selected. 

Select notes that are not adjacent to each other
1. Click on the first note.
2. Hold down the CTRL key.
3. With the CTRL key down select the notes you want included.
4. When all cells selected, let go of the CTRL key.

Once the notes are selected the following appears on the right.
The items at the top are little versions of the notes you have selected. 

5. Click Create Table of Contents Note

A new note is created which contains the title of the notes selected.
Each title is a hyperlink to that note. Very handy to find specific notes.


Evernote: S is for Share on Social Media

You might want to share a note with others. They do not have to have Evernote to receive the contents of the note. Any photo or certificate or information can be shared with anyone.

Note: Each Evernote package has a limit as to how many you can share and receive. 

1. Select the note you want to share with other people. 

2. Click Share in the top right hand corner of the note.

3. Choose where and how you are going to share the note to.

This post will only illustrate how to share on Social Media.
Copy Share URL is explained for U is for URL post for the same A to Z Challenge. 

Share to Social Media: Twitter

1. Click on Social.


2. Select Twitter. 


3. Evernote opens Twitter in your default web browser. 

4. Review the tweet and click Tweet.


Shared with Me
At the bottom of the left panel menu is Shared With Me.
1. Click on Shared With Me at the bottom of the left panel menu.
    If someone has shared notes with you they will now appear.


2. Double click on the note you would like to view.
    It appears in a new window.


Note
When speaking for the The Surname Society (UK) virtual conference, I mentioned that no one had shared a note with me. Soon after I received my first ever note shared with me instead of by me. Kai Michael Poppe, from Germany, shared a note with me. We met at The Genealogy Show and was being very kind.

I later sent a message back on the note which he received. We tried to write notes on the note at the same time but that was not possible. Once one of us closed the note then the other person was able to add their comment but we were not able to make comments at the same time on the same note.

Evernote: R is for Record Audio

If you are around family and someone starts talking about a memory of the family, you can pull out your phone and open your Evernote app to start recording as they tell the story. It is easier than trying to write it down and asking them to repeat so you get all the notes

Always ask permission to record someone as they talk.

1. Open the Evernote app on your phone, computer or tablet.
2. Click on the mic icon.
The recording starts immediately.

Tablet screen layout. Mic is at the bottom.

Enjoy the stories!

Evernote: Q for QuickSearch

There are two ways to search for text within your notes. Quick search and the search bar. 

Quick Search
1. Click CTRL / Q.
The following screen appears.

2. Type in what you want to search for or select one of the previous searches listed.
Search Bar

1. Click inside the box.

2. Type what you want to find.

A list of the notes with the word or phrase will appear in the Note List.


What you can search for
You can type in the following
  • any text you typed inside the note
  • any text written on a sticky note
  • any text inside a pdf 

The search screen for the website version

Evernote: P is for Post It Notes

I won't ask how many sticky notes you have around your monitor and desk but I know many people have sticky notes all around their desk or fridge.

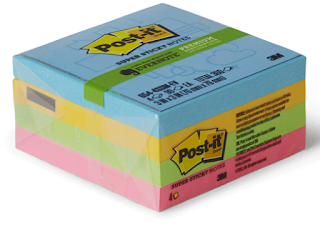
Evernote has a special relationship with Post-It and these colours.

If you have a sticky note written on one of these colours, take a photo of it within Evernote, Evernote makes it automatically into a note.

The note looks like the following:


These are the four colours available.

Evernote: O is for Organize

There are different ways of organizing notes in Evernote. One is by organizing notes into notebooks as illustrated in N is for Notebooks.

Another way to organize your notes, so you can find it later, is by using Tags.
There is a big conversation, out there, as to which is better, notebooks or tags. I like to use both.

Tags
A tag can be added to any note. A note can have more than one tag.
For example, if a note is a birth certificate. The tags could be Birth Certificate

A tag could be 
  • a surname
  • a location: town, city, county, country. 
  • certificate type: birth, christening, marriage, death, burial
  • topic: such as "To Do", "Find", "DNA"
  • Organization 
  • Website as a source or reference. 
Tag rules
  • can have spaces, upper and lower case letters, numbers
  • all characters allowed except commas 
  • maximum of 100 characters
  • can have their own subtags.
To see the list of tags available
1. Click on the Tags menu item at the bottom of the Left Panel menu.


2. The list of tags will appear on the right where a note usually appears.
3. Double click on a tag to view all notes that have that tag attached.
The list of tags appears in the Note List area. The top note will be selected and will appear on the Note Panel (the right section of the screen).

To add a tag to a note
1. At the top of the note is the Notebook they are saved in and a box ready to enter the tag name.

2. Click on the text "Add Tag" to enter a tag.
The box area turns blue as shown below.

3. Type in the name of the tag you want to identify with this note.
I typed in Google Sheets in the example below.

To remove a tag from a note
1. Click on the note you want to change the tags of.

2. Right Click on the tag you want to remove from the note.
The following menu appears. 
Remove Removes just that tag from this note. It will still be available for other notes and will appear on the list of available tags.

Delete Deletes that tag from all notes and from the list of the tags available.

Rename...   Change the tag for all notes that tag appears on and all future notes.

Copy Copies the tag to...


Tags can have subtags
1. Click on the Tags menu item from the left menu
The tags appear on the left

2. Right click on the tag you want to create a subtag for.
The following menu appears
3. Click Create Tag in "the name of the tag" (The first item on the menu.)

4. Enter the name you want for the sub tag.

5. Click OK or hit Enter.

List of tags are available on the Left Panel.
1. Click on the arrow to the left of the word Tags
The tags appear on the left

A list of tags and subtags appears under the title "Tags" on the Left Panel as shown below


Evernote: N is for Notebook

Notebooks are one good way to organize the notes. Think of it as a file folder.
(More organization items are mentioned in O for Organization.)

Create a Notebook for each surname or a location your ancestors lived then all notes related to that surname or location can be filed into that notebook so that you can find it later.

There are two ways to create a notebook.

To create a Noteboook using the menu
1. Select File from the top main menu.

2. Select New Notebook.

3. Type in a name for the notebook.

4. Hit Enter or click OK.


To create a Notebook using Right Click

1. Right Click on the title Notebooks on the menu on the left.

2. Select Create Notebook.

3. Type  in a name for the notebook.

4. Hit Enter.


To create a Notebook in another Notebook. 
1. Right-Click on the Notebook you want to have a notebook create a notebook in and the following menu appears.

2. Create Notebook.

3. Type in a name for the notebook.

4. Hit Enter.